The Grid System
In GooeyPie, you organize your app’s layout using a grid system.
- Columns go across (1, 2, 3, …)
- Rows go down (1, 2, 3, …)

Adding widgets to the grid
Section titled “Adding widgets to the grid”To add a widget to the window, you use the add() method, and specify the column and row for that widget:
app.add(widget, column, row)
Widget Spacing and Margins
Section titled “Widget Spacing and Margins”By default, GooeyPie gives all widgets and containers a comfortable, uniform cushion of spacing around them when they are added to a grid cell. This ensures your app looks clean right out of the box without you needing to manually push things apart.
However, you can override these defaults and fine-tune your layout using margin parameters directly inside the add() method. There are 7 margin arguments available to give you complete control over spacing:
| Parameter | What it controls | Example |
|---|---|---|
margin | Sets all 4 sides to the same value simultaneously | margin=10 |
margin_horizontal | Sets the left and right margins together | margin_horizontal=20 |
margin_vertical | Sets the top and bottom margins together | margin_vertical=5 |
margin_left | Overrides just the left edge | margin_left=0 |
margin_top | Overrides just the top edge | margin_top=15 |
margin_right | Overrides just the right edge | margin_right=0 |
margin_bottom | Overrides just the bottom edge | margin_bottom=8 |
Setting Uniform Spacing
Section titled “Setting Uniform Spacing”If you want to add a large, equal cushion on all sides of a widget, use margin:
# Gives the label a 20-pixel cushion on all sidesapp.add(name_lbl, 1, 1, margin=20)Changing Specific Sides
Section titled “Changing Specific Sides”You do not need to specify all four sides if you only want to change one. Any side you leave out will simply keep its default spacing.
# Keeps default spacing on top, left, and right, but removes the bottom margin entirelyapp.add(name_lbl, 1, 1, margin_bottom=0)
# Left and right margins set to 10, top margin set to 15, bottom margin keeps its default valueapp.add(submit_btn, 1, 2, margin_horizontal=10, margin_top=15)Spanning Columns and Rows
Section titled “Spanning Columns and Rows”Sometimes you want a widget to stretch across multiple columns or rows. You can do this using the column_span and row_span parameters when adding a widget:
app.add(widget, column, row, column_span=2, row_span=2)This will make the widget span across 2 columns and 2 rows, allowing it to take up more space in the layout. You can adjust the column_span and row_span values to fit your design needs.
Spanning Example
Section titled “Spanning Example”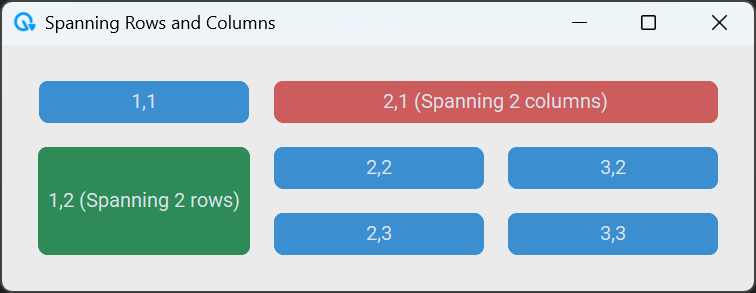
import gooeypie as gp
app = gp.GooeyPieApp("Spanning Rows and Columns")
# Create widgetsbutton1 = gp.Button("1,1", None)red_button = gp.Button("2,1 (Spanning 2 columns)", None)green_button = gp.Button("1,2 (Spanning 2 rows)", None)button4 = gp.Button("2,2", None)button5 = gp.Button("3,2", None)button6 = gp.Button("2,3", None)button7 = gp.Button("3,3", None)
red_button.style.button_color = 'IndianRed'green_button.style.button_color = 'MediumSeaGreen'
# Row 1app.add(button1, 1, 1)app.add(red_button, 2, 1, column_span=2, expand_horizontal=True) # Spans col 2 and 3
# Row 2app.add(green_button, 1, 2, row_span=2, expand_vertical=True)    # Spans row 2 and 3app.add(button4, 2, 2)app.add(button5, 3, 2)
# Row 3 (filling in the rest)app.add(button6, 2, 3)app.add(button7, 3, 3)
app.run()
Alignment and expansion
Section titled “Alignment and expansion”Once a widget is placed in a grid cell, you can control how it behaves if that cell happens to be larger than the widget itself.
Alignment: “Where do I sit?”
Section titled “Alignment: “Where do I sit?””Alignment tells the widget where to place itself itself within the space of its cell.
| Argument | Purpose | Allowable Values |
|---|---|---|
align_horizontal | Left-to-right position | "left", "center" or "right" |
align_vertical | Top-to-bottom position | "top", "center" or "bottom" |
Expansion: “Should I stretch?”
Section titled “Expansion: “Should I stretch?””Expansion tells the widget to stop being its natural size and instead grow until it touches the edges of its cell.
expand_horizontal. Set toTrueto stretch the widget to the full width of the cell.expand_vertical. Set toTrueto stretch the widget to the full height of the cell.
Column and Row Weights
Section titled “Column and Row Weights”When you resize a window, GooeyPie needs to know which columns and rows should grow to fill the extra space. We do this using weights.
Think of a weight like a spring placed inside a column or row:
-
Columns have “Springs”: By default, all columns have a weight of 1. They will automatically push against the window edges to fill space evenly. But keep in mind, the widgets themselves will not automatically grow to fill that space!
-
Rows are “Tight”: By default, rows have a weight of 0. They have no springs; they stay as small as possible to fit your widgets unless you tell them to grow.
How to Set Weights
Section titled “How to Set Weights”To control how your grid grows, set the weights for the entire grid at once. This gives you a clear “map” of your layout in one line of code.
You can set the weight of columns and rows using the set_column_weights() and set_row_weights() methods:
app.set_column_weights(column1_weight, column2_weight, ...)app.set_row_weights(row1_weight, row2_weight, ...)- A weight of 1 means the column or row will grow to fill available space.
- A weight of 0 means it will not grow at all.
- You can use any positive number for weights, and they will be distributed proportionally. For example, if you have two columns with weights 1 and 2, the second column will grow twice as much as the first when the window is resized.
The “Magic Combo” for Filling Space
Section titled “The “Magic Combo” for Filling Space”If you want a widget to fill up the space available in its cell, you need to use two things together:
- A weight > 0: This makes the Column or Row grow .
- An expansion (
expand_horizontalorexpand_vertical): This makes the Widget stretch to fill that newly grown space.
Without expansion, the cell grows, but the widget stays small in the middle!
Example: A Message Form
Section titled “Example: A Message Form”In this example, we want the second column to grow when the window is resized horizontally, so that the Entry and Textbox stretch to fill the space. We also want the Textbox to grow vertically, so it takes up more space as the window gets taller.
import gooeypie as gp
app = gp.GooeyPieApp("Message Form")
# Name label and entryname_label = gp.Label("Name")name_entry = gp.Entry()
# Message label and textboxmessage_label = gp.Label("Message")message_textbox = gp.Textbox()
submit_btn = gp.Button("Send Message", None)
# Add widgets, make sure widgets expand as neededapp.add(name_label, 1, 1)app.add(name_entry, 2, 1, expand_horizontal=True)app.add(message_label, 1, 2)app.add(message_textbox, 2, 2, expand_horizontal=True, expand_vertical=True)app.add(submit_btn, 2, 3, align_horizontal="right")
# Set column weightsapp.set_column_weights(0, 1)  # 2 columns, only grow the second one
# Set row weightsapp.set_row_weights(0, 1, 0)  # 3 rows, only grow the middle one
app.run()